Let’s be honest. As parents in 2026, we are living in a permanent tug-of-war. On one side, we know our children need to be tech-savvy. The future is built on code, and the NEP 2020 in India has made it clear: coding and computational thinking are the new “literacy.”
On the other side? We see the “iPad Hunch.” We see the glazed-over eyes after two hours of Minecraft. We worry about digital eye strain, posture, and the loss of that tactile, “dirty-hands” kind of play that we enjoyed as kids.
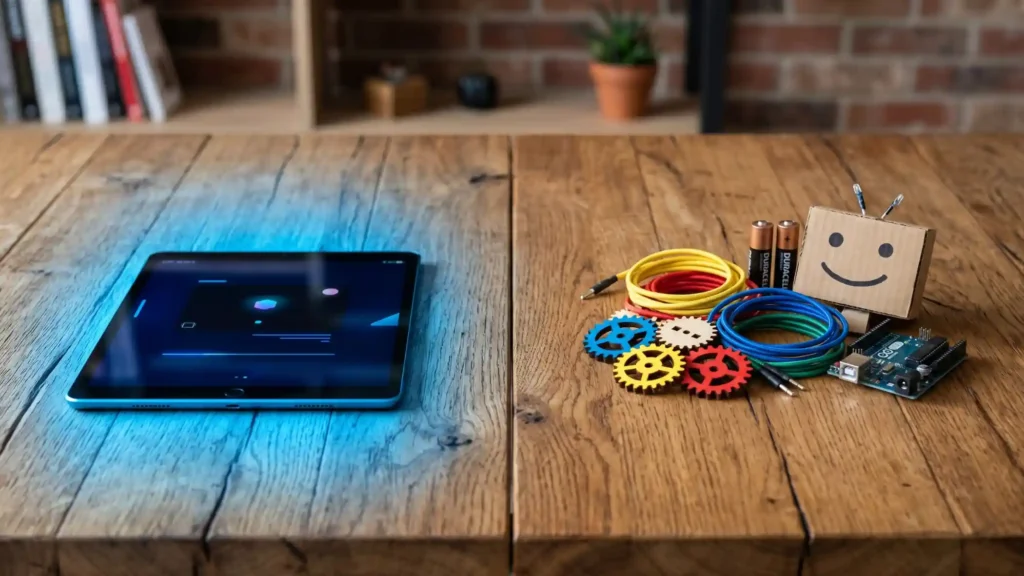
But what if I told you that the best way to learn the highest level of technology is actually to step away from the screen?
If you want to teach STEM without more screen time, this guide to screen free robotics for kids is exactly what you need.
Table of Contents
1. What Exactly is Screen Free Robotics?
It sounds like a contradiction, doesn’t it? How can you learn robotics—a field driven by software—without a screen?
The secret lies in Physical Computing. In traditional coding, a child types a command, and a pixel moves on a monitor. In screen-free robotics for kids, the screen is merely the “translator.” Once the code is uploaded to a board like the Arduino UNO, the screen disappears. The learning happens on the living room floor, where a physical machine reacts to a physical wall.
The screen is just the tool, but the robot is the teacher. This approach ensures that the “logic” stays in the child’s mind, not just on the glowing display.
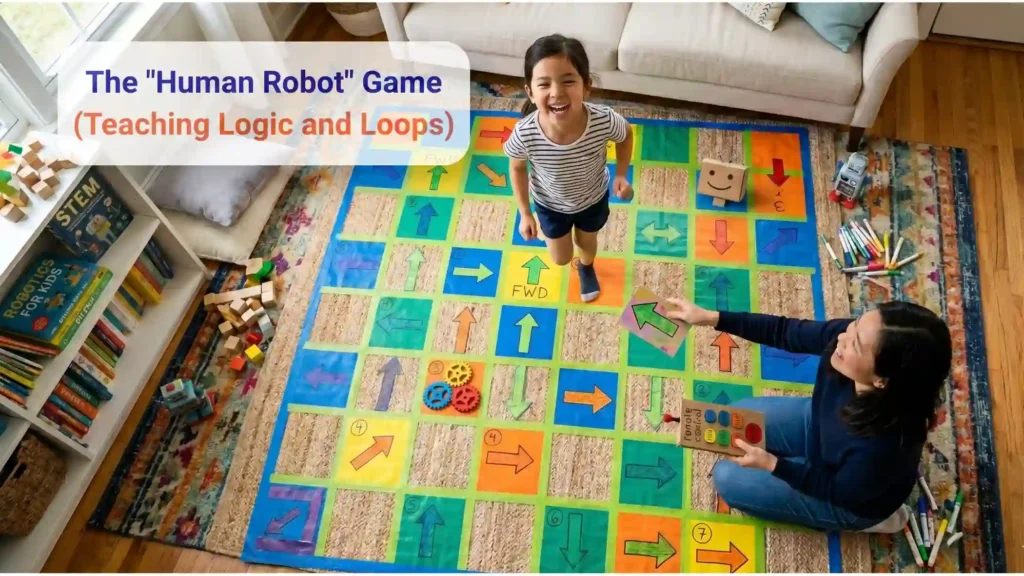
2. Game 1: The “Human Robot” (Teaching Logic and Loops)
Kids can start learning coding and robotics before using a computer or building a robot. This game helps them understand how technology “thinks” by using movement, simple instructions, and everyday objects. This is a foundational pillar of screen free robotics for kids.
Goal of the Game: Get the Robot across the room!
What You Need:
- An open space like a living room or classroom
- A pillow or soft object to act as an obstacle
- One child and one parent (or teacher)
Step 1: Choose Roles
- The child becomes the “Coder” — the person who gives instructions.
- The parent becomes the “Robot” — the robot can only do exactly what the coder says.
Explain to kids:
“Real robots don’t guess what to do. They follow instructions step by step.”
Step 2: Robot Starting Mode (“Getting Ready”)
The setup ( ) phase:
Place the robot at one side of the room.
Tell the child:
“Before robots begin, they get ready first. They check if everything is working.”
The robot can pretend to:
- Open its “camera sensors” (eyes)
- Stand still at the starting line
- Wait for the command:
“Start!”
This teaches kids that robots prepare before beginning a task.
Step 3: Make the Robot Move (Learning Repeating Actions)
The loop ( ) phase:
Ask the child to tell the robot:
“Walk forward.”
The robot takes one step.
Then ask:
“Should the robot stop forever?”
Kids will usually say no.
Explain:
“Robots often repeat actions again and again until something changes.”
Now the robot keeps walking forward one step at a time.
Walk.
Walk.
Walk.
This introduces the idea of repeating instructions, which is an important coding concept.
Step 4: Add a Challenge (Learning Decision Making)
The if-else Logic:
Place a pillow in the robot’s path.
Tell the child:
“Now our robot needs to make a choice.”
Give this rule:
“If you see a pillow, then stop and turn right. Else (otherwise), keep walking forward.”
The robot moves.
Sees the pillow.
Stops.
Turns right.
Keeps going.
Why This Works
Kids are not memorizing computer words. They are learning how coding works through movement and play.
They discover:
- Instructions matter
- Actions can repeat
- Robots make decisions based on rules
- Cause and effect changes what happens next
By acting it out, children begin understanding coding and robotics naturally — no screens needed.
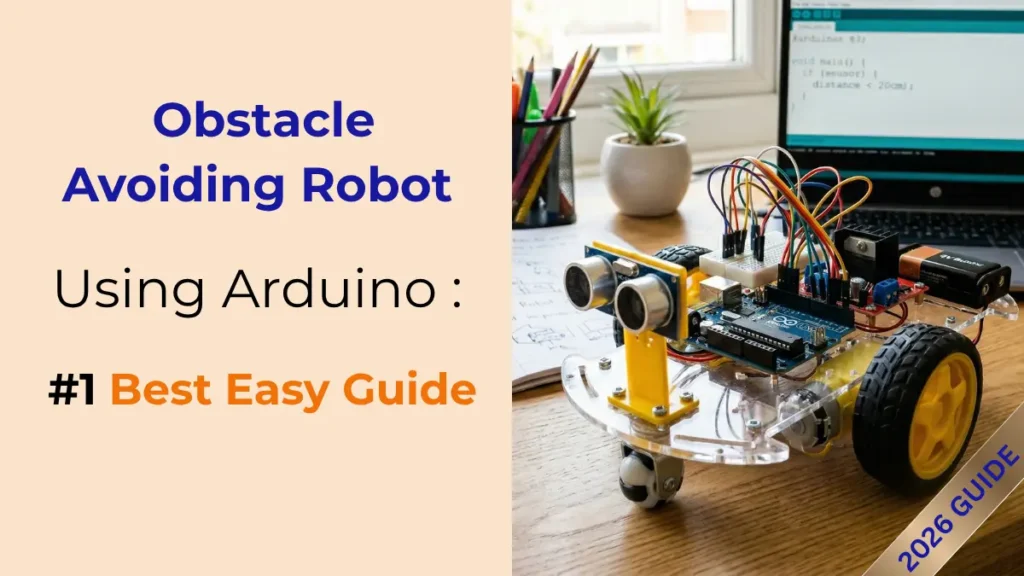
This Human Robot game is same as we built in our previous obstacle-avoiding Robot project.
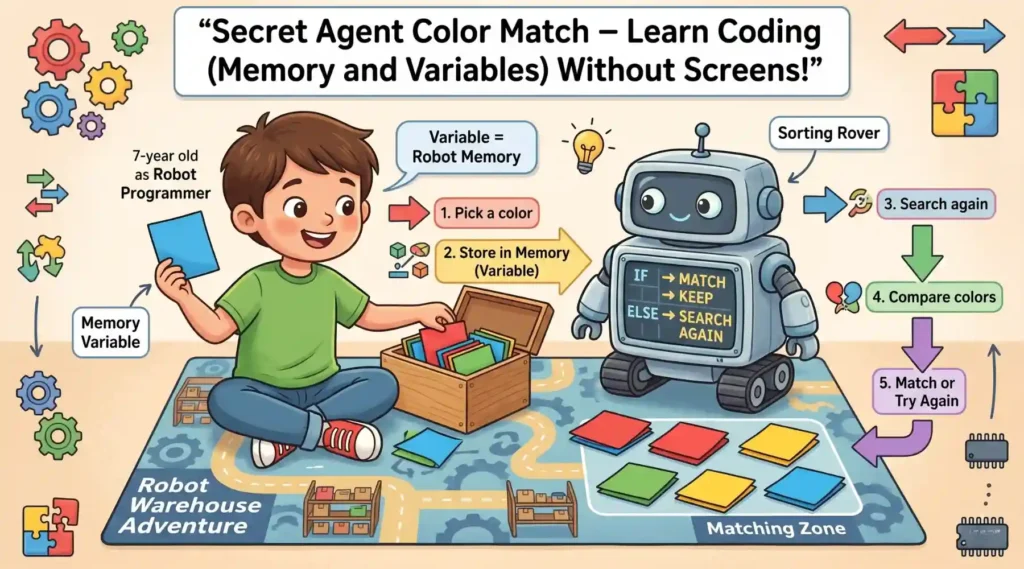
3. Game 2: The Secret Agent “Color-Match” (Memory and Variables)
This game is completely screen free robotics for kids and it moves from movement to Intelligence.
Today, your child becomes a Robot Programmer working inside a busy warehouse filled with colorful packages. A helpful robot called the Sorting Rover has an important job: it must find matching color packages and organize them correctly.
But there is a problem.
The Sorting Rover can only remember one thing at a time, just like computers store information in a special place called a Variable.
Your child’s mission is to help the robot remember, search, compare, and make smart decisions — exactly how programmers teach robots to think.
What You Need :
• 1 small box, bag, or container
• 8 paper squares : 2 Red papers, 2 Green papers, 2 Blue papers, 2 Yellow papers
Fold or mix all papers so colors cannot be seen.
Learning Goal
Children naturally practice:
• Variables (storing information)
• Memory management
• Searching algorithms
• Comparison logic
• IF / ELSE coding decisions
• Problem-solving skills
• Focus and working memory
No screens. No typing. Just movement, thinking, and play.
Step 1: Start the Mission
Say to your child:
“Agent Programmer, the Sorting Rover is ready. But robots cannot remember everything. They need a special memory storage place called a Variable.”
Choose the child’s left hand as the robot’s “Memory Storage.”
Explain:
“Whatever color goes into your left hand becomes the robot’s Memory Variable.”
Step 2: Pick the First Color (Store Information)
Ask the child to close their eyes and reach into the box.
They pick one paper square.
Example:
The child pulls out a Blue square.
Say:
“The robot found Blue. Store Blue in Memory.”
The child keeps the Blue square in their left hand.
Explain simply:
“Programmers call this saving information inside a Variable. The robot now remembers Blue.”
Step 3: Search the Warehouse
Now tell the child:
“The Sorting Rover must search for another package.”
The child reaches into the box again and picks a second square.
Example 1:
Second paper = Blue.
Say:
“Robot check initiated…”
Ask:
“Does the new color match the Memory color?”
The child compares:
Blue = Blue.
Say excitedly:
“MATCH FOUND! Sorting Rover completed its task.”
The child keeps both papers together.
Example 2:
Second paper = Yellow.
Ask:
“Does Yellow match Memory Blue?”
Child answers:
“No.”
Say:
“Robot Decision System activated.”
Teach the coding idea:
 IF new color matches Memory
           Keep the pair
      ELSE
           Put it back and search again
Child places Yellow back into the box.
Step 4: Continue Searching
The child continues searching until they find the matching color.
Every attempt teaches:
• Remember information
• Compare information
• Make decisions
• Try again when needed
These are the same thinking patterns robots and computer programs use.
Step 5: Repeat Until Warehouse Is Clean
Once one pair is matched:
• Remove the pair from play
• Pick a new “Memory Color”
• Continue until all colors are matched
Mission complete when the warehouse is fully sorted.
Extra Challenge Levels
Level 2: Speed Programmer
Use a timer.
Challenge:
“Can your robot finish sorting in under 2 minutes?”
Teaches efficiency.
Level 3: Memory Upgrade
Child cannot look at their Memory hand after storing the first color.
They must remember mentally.
Builds stronger memory skills.
Level 4: Two Variables Mode
Older children store two colors:
Example:
Left hand = Red
Right hand = Green
Robot must search for both.
Introduces multiple variables.
Parent Coding Connection
After playing, explain:
“Computers store information in Variables.”
“Robots compare information before making decisions.”
“Searching through the box works like a Search Algorithm.”
“IF this happens → do one action. ELSE → do another.”
Your child experiences coding ideas physically first, making programming concepts feel natural long before using a screen.
This turns coding into movement, imagination, and problem-solving — helping children think like programmers while simply playing a game.
4. Game 3: The Magic “Truth-Detector” (Electrical Circuits)
Now, let’s look at the “Hardware” side of screen free robotics for kids. This project is a classic: The Electric Quiz Board.
The Science: Open vs. Closed Circuits
This fun activity helps children learn science while playing. It works like a quiz game, but instead of a screen or mobile app, children use wires, a battery, and a light to check whether their answer is correct.
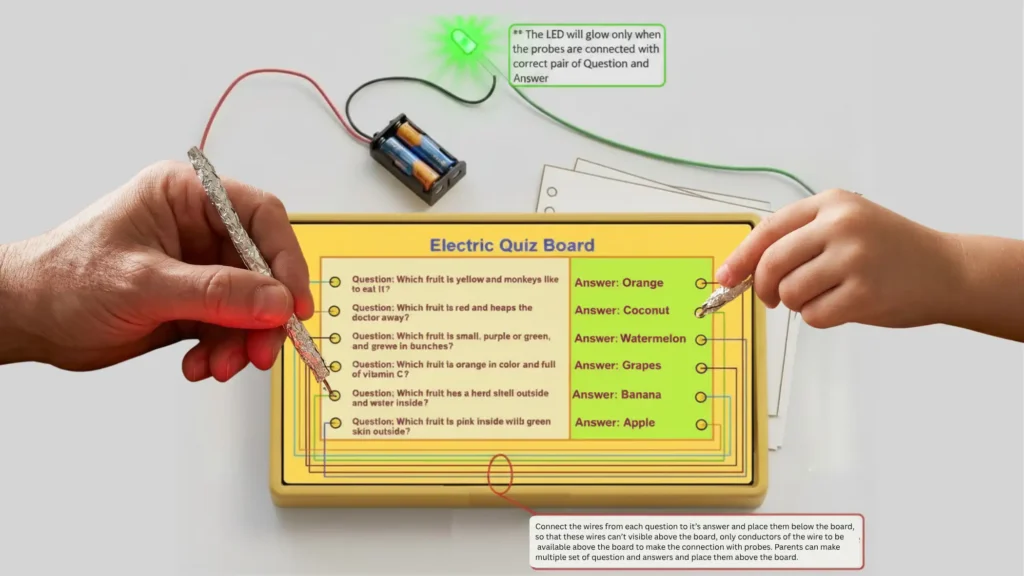
What Children Learn
Children learn about electric circuits.
Electricity can only flow when it gets a complete path to travel.
- Open Circuit = Path is broken → Electricity cannot flow → Light stays OFF.
- Closed Circuit = Path is complete → Electricity flows → Light turns ON.
This teaches children how simple electrical devices work.
Materials Needed
- Cardboard or wooden board
- Small LED light
- Battery (2 AA batteries or a small battery pack)
- Insulated copper wires
- Metal paper clips or metal pins
- Tape or glue
- Question and answer sheet
Construction (How to Make It)
- Take a cardboard or wooden board.
- Write questions on the left side and answers on the right side. Mix the answers so children have to think before choosing.
Example:
Question:
- National fruit of India → ?
Answers:
- Banana
- Coconut
- Mango
- Water melon
- Apple
- Orange
- Fix a metal paper clip or metal pin beside every question and it’s answer.
- Turn the board over.
- Using copper wires, secretly connect each question to its correct answer from the back side.
Example:
One wire to be connected at it’s one end with the question “National fruit of India” and other end of this wire to be connected to the answer of this question i.e. “Mango”. Similarly all questions to be connected to their correct answer with two ends of a wire.
- Make a testing tool (probe) using:
- Battery
- LED light
- Two long wires
Place two AA size batteries in the battery holding box. Connect the negative terminal of the battery box to the negative terminal (the smaller leg) of LED. Now connect one long wire with positive terminal of battery box and make a probe at the other end of this wire by cutting and exposing the conductors and connect another long wire with positive terminal (the longer leg) of LED and make another probe by cutting and exposing the conductors at other end of this wire in similar way.
Now one probe to touch the question pin, and the other probe to touch the answer pin.
Working (How It Works)
When a child touches the correct question and correct answer together:
- Electricity gets a complete path.
- Circuit becomes closed.
- LED light glows.
If the answer is wrong:
- Electricity cannot complete the path.
- Circuit remains open.
- LED does not glow.
Example:
Question: “National animal of India”
Child touches:
- Question pin → “National animal”
- Answer pin → “Tiger”
Correct connection → Light glows ✔️
If child touches “Elephant”:
Wrong connection → Light stays OFF ✖️
Learning Benefit
Children also learn problem-solving skills.
If the light does not glow, they can check:
- Is any wire loose?
- Is the battery weak?
- Is the LED connected properly?
This tactile troubleshooting is a core skill in screen free robotics for kids.
Here are some more advanced screen free robotics for kids and coding game ideas that build on the same “move first, code later” approach. These add concepts like debugging, variables, sensors, algorithms, and teamwork while keeping it playful.
5. Game 4 : Robot Delivery Mission (Learning Algorithms + Planning)
Mission: The robot must deliver an object (toy, book, or ball) to a target location.
Setup:
Create obstacles using pillows, chairs, or boxes.
Roles:
• Child = Programmer
• Parent = Robot
The child must give the entire set of instructions before the robot starts moving.
Example:
“Take 3 steps forward → Turn left → Take 2 steps → Pick up the toy → Turn right → Walk 4 steps.”
If the robot crashes into something, don’t fix it immediately.
Ask:
“What should we change in our program?”
This teaches:
• Planning ahead
• Breaking big problems into smaller steps
• Algorithms
• Debugging mistakes
6. Game 5 : Secret Sensor Game (Learning Sensors + Inputs)
Mission: In this screen free robotics for kids project, the Robot reacts to different “sensor signals.”
Create pretend sensors:
• Clap = Sound sensor
• Flashlight = Light sensor
• Touch shoulder = Touch sensor
Rules:
“If you hear 2 claps → spin.”
“If shoulder is touched → stop.”
“If light appears → move backward.”
Make combinations:
“If light appears AND sound happens → jump.”
This teaches:
• Sensors
• Inputs and outputs
• Multiple conditions
• Robot decision-making
7. Game 6 : Energy Robot (Learning Variables)
Give the robot an “energy level.”
Example:
Robot starts with 10 energy points.
Rules:
• Walking = -1 energy
• Jumping = -2 energy
• Charging station = +5 energy
Kids must track energy while completing missions.
Add challenge to this Screen Free robotics for Kids project
“Can you finish the mission without running out of power?”
This introduces:
• Variables
• Resource management
• Tracking changing values
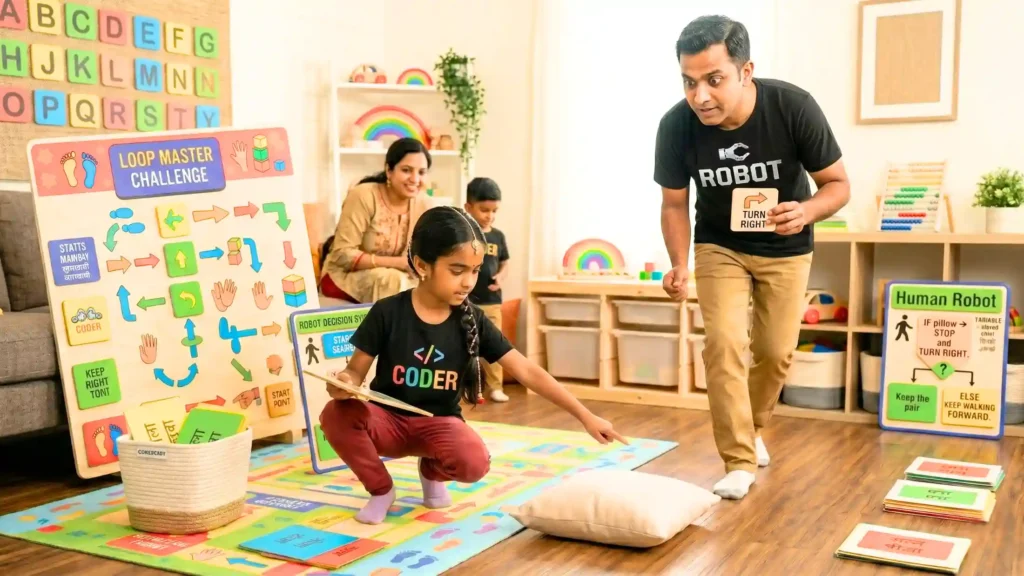
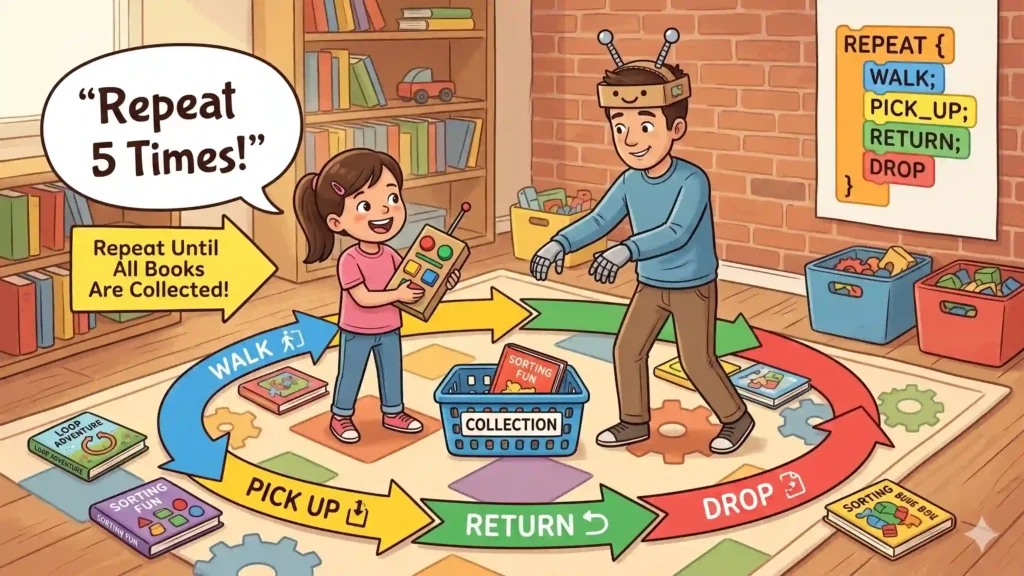
8. Game 7 : Loop Master Challenge (Learning Loops Deeply)
Give repetitive jobs.
Example:
Place 5 books across the room.
Instead of:
“Walk → pick up → walk → drop → repeat…”
Teach:
“Repeat 5 times: • Walk forward • Pick up object • Return • Drop object”
Later add:
“Repeat until all objects are collected.”
This teaches:
• Loops
• Efficiency
• Automation thinking
This Screen Free robotics for Kids project will help learning use of Loop function.
9. Game 8 : Robot Factory Team Game (Learning Functions)
Multiple family members become robots.
Create robot jobs:
Robot A = Picker
Robot B = Carrier
Robot C = Sorter
Child builds a process:
“Picker gets toy → Carrier moves toy → Sorter places toy in basket.”
Explain:
“Big robots and factories split work into smaller jobs.”
This Screen Free robotics for Kids project teaches:
• Functions
• Modular thinking
• Team systems
10. Game 9 : Memory Robot AI Game (Learning Simple Artificial Intelligence)
Robot remembers patterns.
Example:
Child taps table:
Tap-Tap-Clap
Robot copies.
Make it harder:
Tap-Clap-Tap-Clap
Later add:
“If pattern repeats twice, predict the next move.”
This Screen Free robotics for Kids project introduces:
• Pattern recognition
• Memory systems
• Early AI thinking
11. Game 10 : Maze Rescue Mission (Learning Real Robotics Thinking)
Build a maze with chairs and pillows.
Mission:
“Find the trapped teddy bear.”
Rules:
• Robot can only move from instructions
• Robot must avoid walls
• Child updates instructions when blocked
Advanced mode:
Robot can only “see” one step ahead.
This feels very close to how real robots navigate environments.
These activities quietly teach real coding ideas: algorithms → loops → debugging → sensors → variables → functions → AI thinking, while staying completely screen free robotics for kids and make it playful.
12. Why Tactile Learning Beats Virtual Learning
There is a biological reason why screen free robotics for kids is so effective.
- Fine Motor Skills: Tightening screws and plugging in jumper wires develops hand-eye coordination that clicking a mouse simply cannot match.
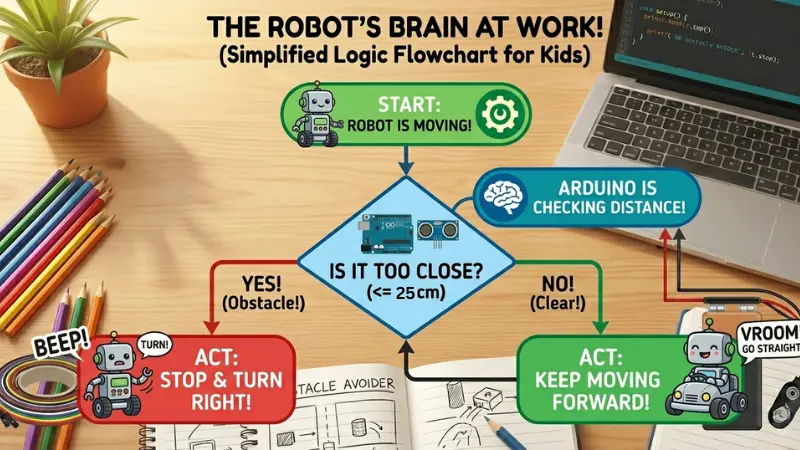
- Spatial Awareness: In a video game, “distance” is just a number. In robotics, “20cm” is a physical gap. When the robot fails to stop and crashes into a real wall, the failure is tangible.
- The Focal Shift: Unlike a tablet that keeps eyes fixed at one distance, robotics requires “Focal Switching”—looking from a tiny wire to a distant robot on the floor. This is significantly healthier for developing eyes.
13. The NEP 2020 Connection: Learning by Discovery
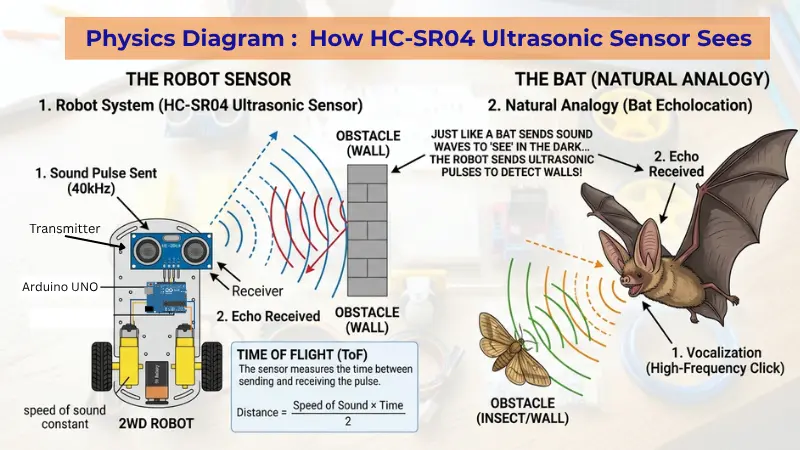
The National Education Policy (NEP) 2020 emphasizes Discovery-Based Learning. Instead of a teacher standing at a blackboard explaining physics, screen free robotics for kids allows the child to discover it.
When they see an Ultrasonic Sensor send a “ping” (just like a bat!) and wait for the echo, they are learning the Physics of Sound. When they calculate the time it takes for that sound to return, they are doing Applied Mathematics. This “Integrated STEM” approach is exactly what modern education aims for.
14. From “Consumer” to “Creator”
Most digital toys encourage kids to be Consumers—they press a button, and the toy does a pre-programmed trick. Screen free robotics for kids flips the script.
When a child builds a robot, they become the Creator. They realize that the “magic” inside their favorite gadgets isn’t magic at all—it’s logic, electricity, and engineering. This shift in mindset is permanent. They stop asking “What does this toy do?” and start asking “How can I make this toy better?”
15. 5 Tips for a Screen-Reduced STEM Journey
- The “Paper-First” Rule: Always draw your logic flowcharts in a physical notebook before touching the computer.
- The “Tether-Cut” Strategy: Upload the code via USB, then immediately unplug the cable. The computer stays on the desk; the learning stays on the floor.
- The “Human Debugger”: If the code isn’t working, act out the steps physically in the room to find the mistake.
- Collaborative Building: Have one child be the “Lead Engineer” (Hardware) and the other the “Lead Architect” (Logic).
- Celebrate the Crashes: Every “crash” is a data point. Use it as a moment to laugh and learn.
16. Conclusion: Building a Tangible Future
The future isn’t just digital; it’s physical. From self-driving cars to robotic assistants, the world needs people who understand how software interacts with the real, 3D world.
By choosing screen free robotics for kids, you aren’t just protecting your child’s eyes; you are opening their minds to the fact that they have the power to build the future with their own two hands.
So, are you ready to take the “Human Robot” challenge today? Put the tablet away, grab an Arduino kit, and let’s start building something real!
Now that we’ve mastered the “Mindset” and the “Logic,” it’s time to see it in action. In our next post, we’re going to prove just how powerful code can be. We will take the exact same hardware from our Obstacle Avoider and give it a completely new personality.
Get ready for Post 7: The “Follow-Me” Robot Pet!

Samir Sen is a retired Indian Railways Signalling Engineer with over 30 years of experience in railway signalling systems and safety operations. He also served as a faculty member at a Zonal Signalling Training Institute of Indian Railways, delivering theoretical and practical training in signal engineering. Through SSEN Techno, he simplifies robotics and STEM education for learners and beginners.